I'm trying to consolidate. I've added all the recipes here to my main/family blog Soggy Cheerios. I'll be indexing them so they're easy to find along with adding lots of new recipes. Happy Cooking!
New Index Here
Sunday, February 28, 2010
Tuesday, September 8, 2009
Roasted Tomatoes
A friend of mine posted this recipe on her food blog last week. They sounded delicious so I roasted some tomatoes for pizza on Sunday. They were delicious on veggie pizza. Then I had some leftover so I added them to our pasta tonight. Easy to make and they store well.
Roasted Tomatoes
Roma Tomatoes, halved and gutted (take out the seeds and pulp)
toss with olive oil
spread on cookie sheet with cut side up
sprinkle with kosher salt, coarse sugar and pepper
cook in 300 degree oven for 2 1/2-3 hours- until they look a little shriveled. Proceed to add them to anything you can think of.
My experimental Italian dinner
I've been known to 'exchange services' with people. The service I offer most often is dinner. I do cakes but they take 10 times as long and people don't seem to value them as highly. My current exchange is for piano lessons for my girls. They go to piano and I make their piano teacher dinner. It's a pretty sweet deal for both of us. The following three recipes are all things I tried today and used them as guinea pigs for. They seem okay with that. I've also exchanged dinners for massages and guitar lessons. I love it when I experiment and it's successful. My kids loved it too.
Italian Dinner:
Fettuccine with Red Peppers, Roasted tomatoes and cayenne pepper sauce
Rosemary Focaccia Bread
tossed salad
Dessert:
Chocolate Zucchini Bread
Worst part was that I started making dinner at about 4:30- knowing I was going to make bread. My husband came home from work sick. He didn't even eat any of the dinner I'd slaved over! It made a ton (I doubled all the but the zucchini bread) and I passed out some to the neighbors. I've got to get on their good side somehow right? ;)
Oh- my camera battery is dead- so that's what's up with the lack of pictures. Sorry about that!
Rosemary Focaccia Bread
This is another Best Bites recipe. I made this to go with the Fettuccine with red pepper and cayenne sauce tonight and it was a hit. The original recipe calls for letting the bread raise twice- I didn't have time and formed into loaves immediately and only let it rise once. It turned out pretty dang good. I'll have to start earlier next time and see if the results are even fluffier.
Rosemary Focaccia Bread
1 c. warm (105-115 degrees Fahrenheit) water
Rosemary Focaccia Bread
1 c. warm (105-115 degrees Fahrenheit) water
1 Tbsp. yeast
1 Tbsp. white sugar
1 tsp. Kosher salt, plus more for sprinkling
2 Tbsp. butter, divided
2 Tbsp. rosemary (dried or fresh)
2 1/4-2 1/2 c. all-purpose flour
Sprinkle sugar and yeast in warm water and let sit for 10 minutes until creamy.
Knead in 2 cups of flour, 1 Tbsp butter, 1 Tbsp rosemary until combined. Add remaining flour until no longer sticky (don't add too much).
Let rise until double (unless you don't have time) and then form into two round loaves. Place on greased cookie sheet and cover with a warm towel. Let rise for 45 more minutes. Melt remaining butter and then add in rosemary and a sprinkle of garlic if desired and brush on dough. Sprinkle with kosher salt.
Bake in 375 degree oven for 15-18 minutes until golden brown.
Chocolate Zucchini Bread
I've never made a tasty zucchini bread. The recipes I've tried usually come out with too much baking soda taste. I tried this one from Our Best Bites today. It is heavenly. It makes two loaves- I used one to pay for piano and one is all but 1/4 gone. I don't even think it's all the way cool yet. I may need to make another batch tonight to send in lunches tomorrow. This is a 3 thumbs up recipe for sure!
Chocolate Zucchini Bread
Mix together and set aside:
2 C flour
2 t cinnamon
1/2 t salt
1 1/2 t baking soda
6 T unsweetened cocoa powder
Beat in bowl with mixer:
1/2 C canola oil
1 C sugar
1/4 C brown sugar
3 eggs
2 t vanilla (cut to 1 tsp to make up for the vanilla yogurt)
1/2 C sour cream (I may have not had sour cream and used vanilla yogurt instead..)
3 C grated zucchini
3/4 C mini chocolate chips (I used regular sized chocolate chips and it's still tasty).
Add dry ingredients. My batter was really thin (I think it's because my zucchini was a bit watery) so I added an extra 1/2 cup of flour.
Pour into two pans (sprayed with flour baking spray and then wipe down the top 1/2 inch of sides so you don't get a 'lip') and then top with:
Topping:
2 T brown sugar
2 T white sugar
1/2 t cinnamon
Bake at 350 for 45ish minutes. A toothpick should come out clean.
Fettuccine with Red Pepper Cayenne Sauce
I found this recipe for Fettuccine With Red Pepper Cayenne Sauce at Recipe for Disaster. This recipe was certainly not a disaster. ;) I made a few changes from the original recipe that will be reflected here.
This recipe is easily something you'd order at a nice Italian restaurant. My kids inhaled it- even the one that doesn't like peppers. This would be fabulous with grilled chicken on top also.
12 oz. fettuccine pasta
3 red bell peppers, julienne sliced
3 cloves garlic, minced (I didn't have fresh garlic- which is not a usual thing here- so I substituted a few shakes of garlic powder.)
1/2 small onion, minced
1/3 of a zucchini julienne sliced (I made zucchini bread today and just threw in the leftover)
Roasted Tomatoes (I threw these in because I had them left over from pizza on Sunday)
3/4 tsp. cayenne pepper (Once again I didn't really measure- I shook to taste)
1 cup fat sour cream (I was out of sour cream also- I used powdered sour cream. I think it'd be good with heavy whipping cream as well)
3/4 cup chicken broth (I did this to consistency)
3/4 cup grated Parmesan cheese (I didn't have that much Parmesan so I threw in some asiago, mozzarella and topped it with Romano)
salt and pepper to taste.
Cook pasta in salted water until al dente. Drain.
Meanwhile, in a large skillet, saute red bell peppers, garlic, onions and zucchini in olive oil over medium heat for 3-5 minutes.
Stir in the sour cream and broth. Simmer uncovered for 5 minutes. Remove from heat and stir in cheese- when cheese is melted add tomatoes. Stir in salt, pepper and cayenne pepper to taste.
Toss hot pasta with sauce and serve with Focciacia.
Tuesday, August 25, 2009
Butter Bars
So a couple weekends ago I was hanging out with some friends and one of them mentioned this fabulous dessert that a friend had brought for dinner at their house. 'They were called butter bars and they were so good we just couldn't stop eating them'. So of course I found a recipe and made them. And then made them again. And once more in chocolate. Uh, so they were a hit and SO easy!
YUM!
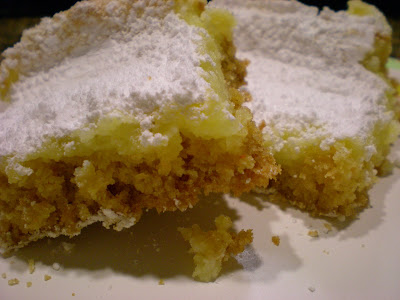
Butter Cake
1 yellow cake mix (I used chocolate today and they were good too- I liked them better chilled than warm though)
1 stick of butter (1/2 cup)
1 egg
Beat butter until it's smooth (but don't melt it- leave it out on the counter for 30 minutes to soften) and then add the egg and cake mix. Mix until it it fully combined and all 'stuck' together.
Press into the bottom of a 9x13 pan.
Next:
1 package (8 ounces) of cream cheese
2 eggs
1 tsp of vanilla
2 cups of powdered sugar (although I think I'll cut it to 1 1/2 cups if I do chocolate again)
Cream the cream cheese, then add the rest of the remaining ingredients. Pour on top of cake mixture. Spread evenly over 'crust'.
Bake at 350 for 30 minutes. Remove after 30 minutes and sprinkle with powdered sugar while hot. The center won't look done- but trust me it is.
I've served it hot, at room temperature and chilled. It's quite lovely at all temperatures. I to prefer the chocolate based one chilled. Mmm... enjoy!
And appearing in chocolate....
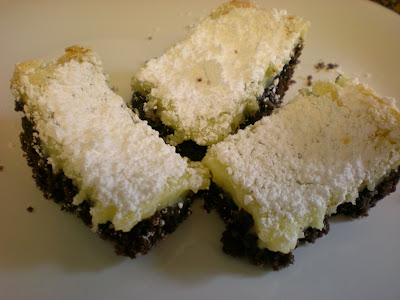
YUM!
Butter Cake
1 yellow cake mix (I used chocolate today and they were good too- I liked them better chilled than warm though)
1 stick of butter (1/2 cup)
1 egg
Beat butter until it's smooth (but don't melt it- leave it out on the counter for 30 minutes to soften) and then add the egg and cake mix. Mix until it it fully combined and all 'stuck' together.
Press into the bottom of a 9x13 pan.
Next:
1 package (8 ounces) of cream cheese
2 eggs
1 tsp of vanilla
2 cups of powdered sugar (although I think I'll cut it to 1 1/2 cups if I do chocolate again)
Cream the cream cheese, then add the rest of the remaining ingredients. Pour on top of cake mixture. Spread evenly over 'crust'.
Bake at 350 for 30 minutes. Remove after 30 minutes and sprinkle with powdered sugar while hot. The center won't look done- but trust me it is.
I've served it hot, at room temperature and chilled. It's quite lovely at all temperatures. I to prefer the chocolate based one chilled. Mmm... enjoy!
And appearing in chocolate....
Subscribe to:
Posts (Atom)